Part 2: Creating the First Actor
Introduction
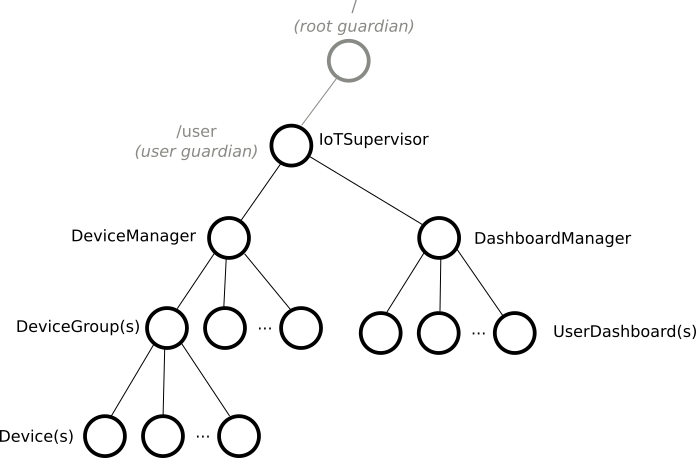
With an understanding of actor hierarchy and behavior, the remaining question is how to map the top-level components of our IoT system to actors. The user guardian can be an actor that represents the whole application. In other words, we will have a single top-level actor in our IoT system. The components that create and manage devices and dashboards will be children of this actor. This allows us to refactor the example use case architecture diagram into a tree of actors:
We can define the first actor, the IotSupervisor, with a few lines of code. To start your tutorial application:
- Create a new
IotSupervisorsource file in thecom.examplepackage. - Paste the following code into the new file to define the IotSupervisor.
- Scala
-
source
package com.example import org.apache.pekko import pekko.actor.typed.Behavior import pekko.actor.typed.PostStop import pekko.actor.typed.Signal import pekko.actor.typed.scaladsl.AbstractBehavior import pekko.actor.typed.scaladsl.ActorContext import pekko.actor.typed.scaladsl.Behaviors object IotSupervisor { def apply(): Behavior[Nothing] = Behaviors.setup[Nothing](context => new IotSupervisor(context)) } class IotSupervisor(context: ActorContext[Nothing]) extends AbstractBehavior[Nothing](context) { context.log.info("IoT Application started") override def onMessage(msg: Nothing): Behavior[Nothing] = { // No need to handle any messages Behaviors.unhandled } override def onSignal: PartialFunction[Signal, Behavior[Nothing]] = { case PostStop => context.log.info("IoT Application stopped") this } } - Java
-
source
package com.example; import org.apache.pekko.actor.typed.Behavior; import org.apache.pekko.actor.typed.PostStop; import org.apache.pekko.actor.typed.javadsl.AbstractBehavior; import org.apache.pekko.actor.typed.javadsl.ActorContext; import org.apache.pekko.actor.typed.javadsl.Behaviors; import org.apache.pekko.actor.typed.javadsl.Receive; public class IotSupervisor extends AbstractBehavior<Void> { public static Behavior<Void> create() { return Behaviors.setup(IotSupervisor::new); } private IotSupervisor(ActorContext<Void> context) { super(context); context.getLog().info("IoT Application started"); } // No need to handle any messages @Override public Receive<Void> createReceive() { return newReceiveBuilder().onSignal(PostStop.class, signal -> onPostStop()).build(); } private IotSupervisor onPostStop() { getContext().getLog().info("IoT Application stopped"); return this; } }
The code is similar to the actor examples we used in the previous experiments, but notice that instead of println() we use Pekko’s built in logging facility via context.logcontext.getLog().
To provide the main entry point that creates the actor system, add the following code to the new IotApp object IotMain class.
- Scala
-
source
package com.example import org.apache.pekko.actor.typed.ActorSystem object IotApp { def main(args: Array[String]): Unit = { // Create ActorSystem and top level supervisor ActorSystem[Nothing](IotSupervisor(), "iot-system") } } - Java
-
source
package com.example; import org.apache.pekko.actor.typed.ActorSystem; public class IotMain { public static void main(String[] args) { // Create ActorSystem and top level supervisor ActorSystem.create(IotSupervisor.create(), "iot-system"); } }
The application does little, other than log that it is started. But, we have the first actor in place and we are ready to add other actors.
What’s next?
In the following chapters we will grow the application gradually, by:
- Creating the representation for a device.
- Creating the device management component.
- Adding query capabilities to device groups.